Julia Package Setup Tutorial
by Brian Jackson
Objective
The objective of this post is to provide a detailed and easy-to-follow guide for setting up a new package in Julia, complete with continuous integration, code coverage, and documentation. At the end I will also provide some workflow tips for newcomers to Julia. This tutorial uses both GitHub and VSCode, and several steps are unique to these tools. If you use different tools, feel free to ignore these steps and adapt them to the tooling of your choice.
For the duration of this tutorial we’ll be working with a hypothetical new
package called NewPackage.jl.
Summary
I. Setting up a New Repository
- Create a new temporary repo on your computer
- Create a new GitHub repository
- Add a
.gitignorefile - Add a
LICENSEfile - Add the repo to your local
devfolder
- Setup VSCode for Julia
- Add package dependencies
- Set up test suite
- Add test-specific dependencies
- Add some code and a unit test
III. Adding CI
- Generate Access Keys
- Add Documentation Workflow
- Setup Documentation directory
- Add the
make.jlfile - Add documentation sources
- Build documentation locally
- Deploy to GitHub Pages
- Add your badges
Part I: Setting up a New Repository
Step 1: Create a new temporary repo on your computer
In your terminal, go to a convenient location where you can create a temporary
local directory. Open a Julia REPL, enter the package manager using ], and
enter generate NewPackage:
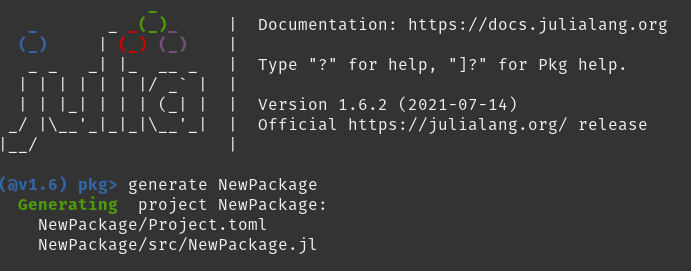
This will create a local directory called NewPackage with the following contents:
src/
  NewPackage.jl
Project.toml
Step 2: Create a new GitHub repository
In GitHub, create a new repository named “NewPackage.jl” (note the trailing .jl
extension). Be sure to create an EMPTY repo (don’t initialize it with a
README.md, .gitignore, or license file). You should get a screen that looks
like the following:
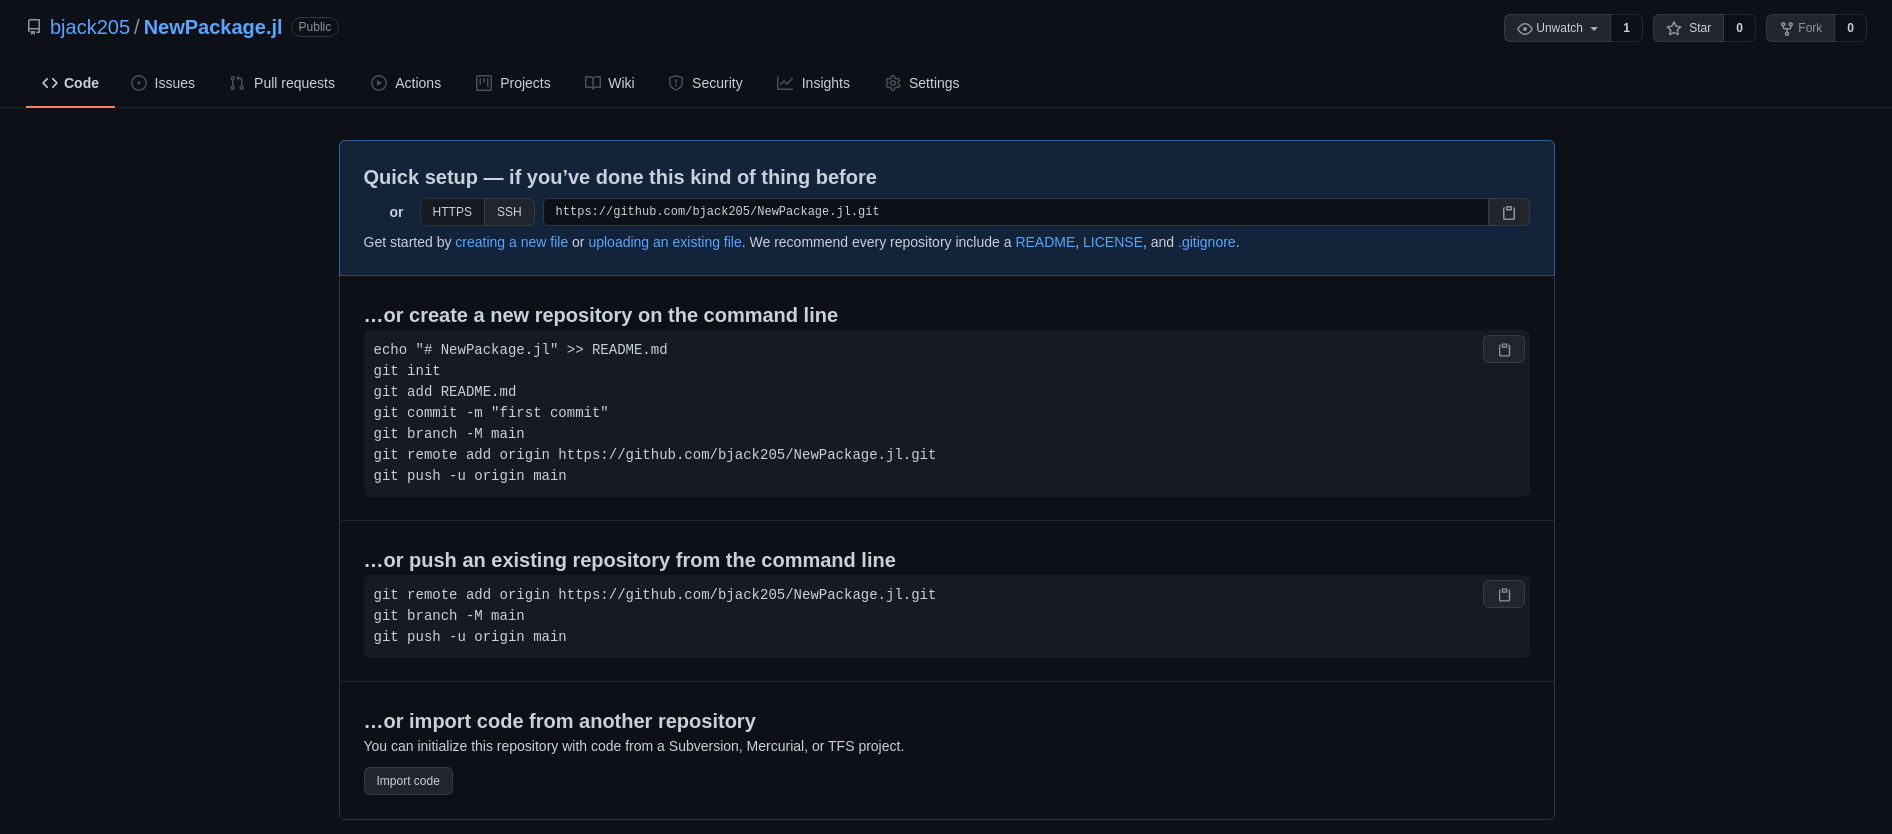
Follow the the steps listed in the page, which are included again here:
echo "# NewPackage.jl" >> README.md
git init
git add README.md
git commit -m "first commit"
git branch -M main
git remote add origin https://github.com/bjack205/NewPackage.jl.git
git push -u origin main
Step 3: Add a .gitignore file
In GitHub, add a file using “Add File | Create New File”, located on the main page:
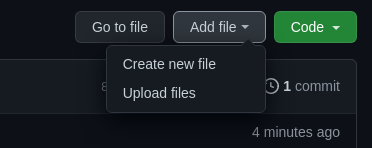
Add a new .gitignore file, and optionally pick a template using the template
selector that pops up on the top-right of the edit window once you enter
.gitignore into the file name field.
The default Julia .gitignore is a great place to start, but feel free to edit it as needed:
# Files generated by invoking Julia with --code-coverage
*.jl.cov
*.jl.*.cov

# Files generated by invoking Julia with --track-allocation
*.jl.mem

# System-specific files and directories generated by the BinaryProvider and BinDeps packages
# They contain absolute paths specific to the host computer, and so should not be committed
deps/deps.jl
deps/build.log
deps/downloads/
deps/usr/
deps/src/

# Build artifacts for creating documentation generated by the Documenter package
docs/build/
docs/site/

# File generated by Pkg, the package manager, based on a corresponding Project.toml
# It records a fixed state of all packages used by the project. As such, it should not be
# committed for packages, but should be committed for applications that require a static
# environment.
Manifest.toml
After editing, commit the file, either directly to the main branch or via a PR (which you should keep open for the next step).
Step 4: Add a LICENCE file
Again using GitHub, add a new file named LICENSE and use the license template
selector that appears to pick a license. The MIT License is a good default.
Commit the file directly to the main branch, or to the new branch you created for your pull request in the previous step. Then merge your PR (possibly with a squash merge) to add both files.
Step 5: Add the repo to your local dev folder
Back in your Julia REPL, still in the package manager, add your new package to
your ~/.julia/dev folder using the dev command in the package manager:
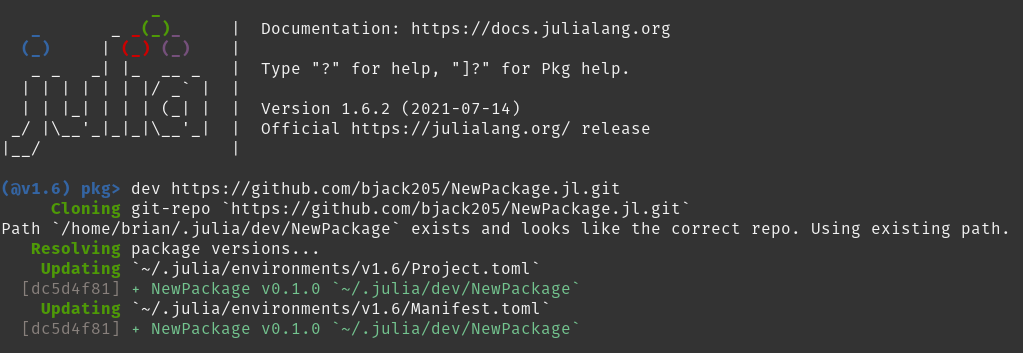
This will clone your repo into ~/.julia/dev/NewPackage, which is on the Julia
package search path, so that you can type using NewPackage anywhere on your
system and it will load your package. You can now delete the original folder we
created in our temporary location.
While I usually find it helpful to keep all my packages in the dev folder,
alternatively you could keep the original location and “register” that local
location instead of the remote GitHub repo using dev
/path/to/your/repo/NewPackage instead of the step above. This downside to this
approach is that it hard-codes a local path into your Manifest file which makes
it non-portable to other users. If you only ever do this for you top-level
(default) Julia environment, this is probably fine.
Part II: Develop your repo
Step 6: Setup VSCode for Julia
Assuming you’ve installed VSCode, launch VSCode and open the directory containing your new package. Add the Julia VSCode Extension. I personally like to change the following setting to provide inline results for easy scripting:
"julia.execution.resultType": "inline"
Step 7: Add package dependencies
To add Julia dependencies to your project, launch the internal VSCode REPL
(using the Julia: Start REPL command from the command palette), and activate
the package environment using activate . in the package manager:

Once you’ve activated the project environment, add packages using the package
manager as you would normally. These packages will automatically get added to
your Project.toml and Manifest.toml files. Let’s add the
StaticArrays package:
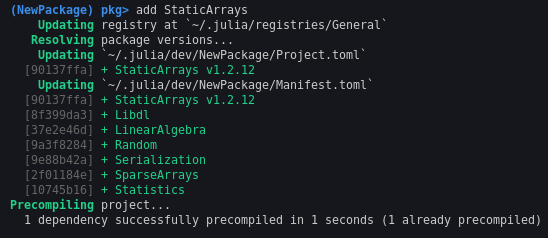
You can see we added version v1.2.12. We’ll add this to our compat section
in our Project.toml file:
# [Project.toml]
name = "NewPackage"
uuid = "dc5d4f81-afb5-4095-bce9-9c33265b931d"
authors = ["Brian Jackson <bjack205@gmail.com>"]
version = "0.1.0"

[deps]
StaticArrays = "90137ffa-7385-5640-81b9-e52037218182

[compat]
StaticArrays = "1.2"
In our src/NewPackage.jl file, include StaticArrays.jl:
module NewPackage

using StaticArrays

greet() = print("Hello World!")

end # module
using vs import
When incorporating external projects, you have the option of either using or import, e.g.
using StaticArrays
or
import StaticArrays
The first option will bring all exported symbols into your package. For a ubiquitous package like StaticArrays, or any of the Julia standard libraries, this is usually nice since most developers are familiar withthe API these packages export.
The second option does not import anything from the package, and all commands must be explicitly imported or prefixed with the package name, e.g.
A = StaticArrays.@SMatrix rand(10,10)
Consider using this as the default for external packages so that it’s clear to outsiders where the variousmethods you’re using come from. For convenience, you can explicitly bring in symbols as needed, e.g.:
using StaticArrays: @SMatrix
or you can create an alias for the package name, e.g.:
const SA = StaticArrays
A = SA.@SMatrix
or, as of Julia v1.6, you can do this directly in the import command:
import StaticArrays as SA
Step 8: Set up test suite
Add a new top-level test folder to your repo and add a runtests.jl file
inside. This is the launch point for your test suite and should be included in
every Julia package / application that uses a test suite.
A basic runtests.jl file should look like:
# [test/runtests.jl]
using NewPackage
using Test

# Test scripts
include(...)
...
where the last part simply includes test suites defined in other files within
the test folder. We’ll addone after the next section.
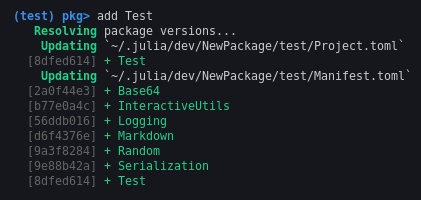
Step 9: Add test-specific dependencies
With our test directory set up, we now need to add our test-specific
dependencies, importantly including the Test standard library. Again the in
REPL package manager, activate the test folder using activate test:

Add, at a minimum, the Julia Test library:
Your directory structure should now look like:
src/
  NewPackage.jl
test/
  Project.toml
  runtests.jl
.gitignore
Project.toml
README.md
Step 10: Add some code and a unit test
We’ll now add some code to our package and check functionality with a unit test.
Add a foo.jl file in the src directory:
# [src/foo.jl]
"""
    foo(x, y)

Creates a 2-element static array from the scalars `x` and `y`.
"""
function foo(x::Number, y::Number)
    SA[x, y]
end
To add this file to our project, include it in src/NewPackage.jl:
# [src/NewPackage.jl]
module NewPackage

using StaticArrays

greet() = print("Hello World!")

include("foo.jl")

end # module
Now let’s create a test to make sure it works as expected. Create a test/foo_test.jl file:
# [test/foo_test.jl]
@testset "Foo test" begin
    v = NewPackage.foo(10,5)
    @test v[1] == 10
    @test v[2] == 5
    @test eltype(v) == Int
    v = NewPackage.foo(10.0, 5)
    @test v[1] == 10
    @test v[2] == 5
    @test eltype(v) == Float64
end
You can run the test suite locally from the package manager by entering test
NewPackage. It’s usually best to run this command from the default environment
(which you can return to using activate without any arguments).
If your tests pass, commit your changes to git before continuing.
Part III: Adding CI
Step 11: Add the CI GitHub Action
To enable CI, add the following script to .github/workflows/:
# [.github/workflows/CI.yml]
name: CI
on:
  push:
    branches:
      - master
    tags: '*'
  pull_request:
jobs:
  test:
    name: Julia ${{ matrix.version }} - ${{ matrix.os }} - ${{ matrix.arch }}
    runs-on: ${{ matrix.os }}
    strategy:
      matrix:
        version:
          - '1.6'
        os:
          - ubuntu-latest
          - macOS-latest
          - windows-latest
        arch:
          - x64
    steps:
      - uses: actions/checkout@v1
      - uses: julia-actions/setup-julia@latest
        with:
          version: ${{ matrix.version }}
          arch: ${{ matrix.arch }}
      - uses: julia-actions/julia-runtest@latest
      - uses: julia-actions/julia-uploadcodecov@latest
        env:
          CODECOV_TOKEN: ${{ secrets.CODECOV_TOKEN }}
NOTE: If your branch is named master instead of main, you’ll need to change that in the on/push/branches section.
Commit the file, and push to GitHub. Under the “Actions” tab in GitHub, you should see the CI action start. If you wait a few minutes, you should see your tests pass.
Step 12: Add Code Coverage with CodeCov.io
It’s usually a good idea to get a feel for how much of your code is being covered by your test suite. We can get the reports automatically from our CI we set up in the previous step using codecov.io. If you haven’t already, log in using your GitHub account. It should prompt you to set up CodeCov for your personal account and for any organizations you have the appropriate permissions for. After going through the setup process, you should be able to enable CodeCov for your new repo by going to your user settings and selecting the “Applications” menu on the left. You should see CodeCov under the list of Installed GitHub Apps. If you select “Configure” and scroll to the bottom uner “Repository access,” you can add your repo there if you haven’t enabled it for all repositories by default.
After a successful CI run, your coverage results should be automatically uploaded to codecov.io where you can view the report. This app will automatically run checks on each PR and commit to the main branch.
Step 13: Add Other Workflows
The following workflow files are also useful:
Create a PR when one of your package dependencies releases a new version.
# [.github/workflows/CompatHelper.yml]
name: CompatHelper
on:
  schedule:
    - cron: '00 00 * * *'
jobs:
  CompatHelper:
    runs-on: ubuntu-latest
    steps:
      - name: Pkg.add("CompatHelper")
        run: julia -e 'using Pkg; Pkg.add("CompatHelper")'
      - name: CompatHelper.main()
        env:
          GITHUB_TOKEN: $
        run: julia -e 'using CompatHelper; CompatHelper.main()'
Automatically create a new tag when you create a release:
# [.github/workflows/TagBot.yml]
name: TagBot
on:
  issue_comment:
    types:
      - created
  workflow_dispatch:
jobs:
  TagBot:
    # THIS 'if' LINE IS NEW
    if: github.event_name == 'workflow_dispatch' || github.actor == 'JuliaTagBot'
    # NOTHING BELOW HAS CHANGED
    runs-on: ubuntu-latest
    steps:
      - uses: JuliaRegistries/TagBot@v1
        with:
          token: $
          ssh: $
Check formatting:
# [.github/workflows/Formattting.yml]
name: format-check
on:
  push:
    branches:
      - 'main'
      - 'release-'
    tags: '*'
  pull_request:

jobs:
  build:
    runs-on: $
    strategy:
      matrix:
        julia-version: [1.3.0]
        julia-arch: [x86]
        os: [ubuntu-latest]
    steps:
      - uses: julia-actions/setup-julia@latest
        with:
          version: $

      - uses: actions/checkout@v1
      - name: Install JuliaFormatter and format
        # This will use the latest version by default but you can set the version like so:
        #
        # julia  -e 'using Pkg; Pkg.add(PackageSpec(name="JuliaFormatter", version="0.13.0"))'
        run: |
          julia  -e 'using Pkg; Pkg.add(PackageSpec(name="JuliaFormatter"))'
          julia  -e 'using JuliaFormatter; format("src", verbose=true)'
      - name: Format check
        run: |
          julia -e '
          out = Cmd(`git diff --name-only`) |> read |> String
          if out == ""
              exit(0)
          else
              @error "Some files have not been formatted !!!"
              write(stdout, out)
              exit(1)
          end'
NOTE: If your branch is named master instead of main, you’ll need to
*change that in the on/push/branches section.
The last one is very optional, but useful. You can use the associated JuliaFormatter package and VSCode extension to automatically format your code.
Part IV: Adding Documentation
Step 14: Generate Access Keys
To allow our code to automatically deploy to GitHub Pages, we need to add some
access tokens. We can generate these tokens very easily using
DocumenterTools.jl. Add
this package to your default workspace (you can remove it afterwards, if you
want), and also bring your package into the REPL with using NewPackage:
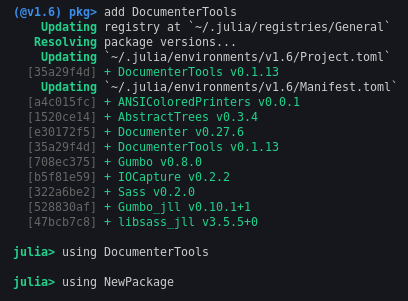
Now use the DocumenterTools.genkeys command to generate your access keys:
DocumenterTools.genkeys(NewPackage)
This will print out 2 keys with instructions with what to do with them. You’ll need to copy one into “Deploy Keys” section of GitHub repository settings, and the other into “Secrets.”
Step 15: Add Documentation Workflow
Add the following file to your workflows:
# [.github/workflows/Documentation.yml]
name: Documentation

on:
  push:
    branches:
      - main
    tags: '*'
  pull_request:

jobs:
  build:
    runs-on: ubuntu-latest
    steps:
      - uses: actions/checkout@v2
      - uses: julia-actions/setup-julia@latest
      - uses: julia-actions/julia-buildpkg@v1
        with:
          version: '1.6'
      - name: Install dependencies
        run: julia --project=docs/ -e 'using Pkg; Pkg.develop(PackageSpec(path=pwd())); Pkg.instantiate()'
      - name: Build and deploy
        env:
          GITHUB_TOKEN: ${{ secrets.GITHUB_TOKEN }} # If authenticating with GitHub Actions token
          DOCUMENTER_KEY: ${{ secrets.DOCUMENTER_KEY }} # If authenticating with SSH deploy key
        run: julia --project=docs/ docs/make.jl
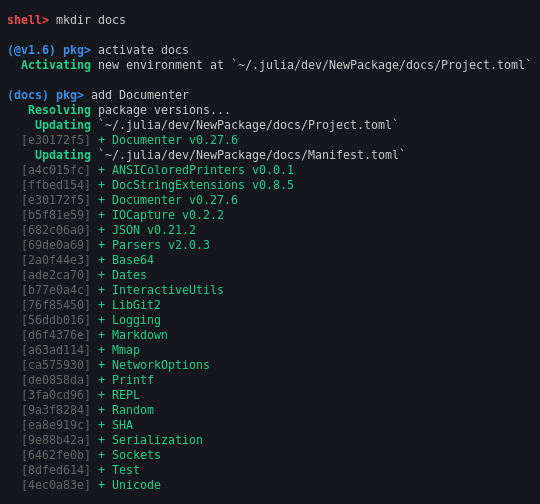
Step 16: Setup Documentation directory
With things set up with GitHub, we’re now ready to start writing our
documentation. We’ll use the well-known
Documenter.jl.
First, create a new docs/ directory in the repository root. Then, in your
Julia REPL, activate the docs/ folder and add Documenter as a dependency.
NOTE You can activate the built-in shell mode of the Julia REPL using ;.
Lastly, create a docs/src directory to store all of the Markdown files for
your documentation. Your directory structure should look like this:
.github/workflows/
  CI.yml
  ...
docs/
  src/
  make.jl
  Project.jl
src/
  NewPackage.jl
  ...
test/
  runtests.jl
  Project.toml
  ...
.gitignore
LICENSE
Project.toml
README.md
Step 17: Add the make.jl file
The docs/ folder should always contain a make.jl file, which provides the
instructions to the documentation build step. A minimal example should look like
this:
using Documenter
using NewPackage

makedocs(
    sitename = "NewPackage.jl",
    format = Documenter.HTML(prettyurls = false),
    pages = [
        "Introduction" => "index.md",
        "API" => "api.md"
    ]
)

deploydocs(
    repo = "github.com/bjack205/NewPackage.jl.git",
    devbranch = "main"
)
NOTE: If your branch is named master instead of main, you’ll need to
*change that in the deploydocs command.
The pages keyword argument sets up the structure of your documentation page.
Each entry is a "Title" => "sourc_file.md" pair. You can also easily create a
nested structure using "Title" => ["SubTitle1" => "sub1.md", ...].
Step 18: Add documentation sources
Now we add the sources for our documentation as Markdown files underneath
docs/src. We’ll add some very basic files to get started:
[docs/src/index.md]
# NewPackage.jl

## Overview
This package is part of a tutorial by Brian Jackson on setting up a new Julia package.
[docs/src/api.md]
    ```@meta
    CurrentModule = NewPackage
    ```

    ```@contents
    Pages = ["api.md"]
    ```

    # API
    This page is a dump of all the docstrings found in the code.

    ```@autodocs
    Modules = [NewPackage]
    Order = [:module, :type, :function, :macro]
    ```
NOTE Indentation is only to keep Markdown from messing up the nested Markdown code.
See Documenter.jl documentation for more information on writing documentation for Julia.
Step 19: Build documentation locally
You can run just the makedocs command from docs/make.jl to generate the
files locally. Just open up docs/build/index.md after it completes to view the
files in your browser.
Step 20: Deploy to GitHub Pages
With all of the setup work we did previously, the only remaining step is to
commit our changes and push to GitHub and let documentation workflow we set up
run and auto-deploy to the local GitHub pages for our repository. Your site
should deploy to https://
Step 21: Add your badges
To show off your repo, it’s usually a good idea to add badges to the top of your root README file. At a minimum, include badges for your build status, code coverage, and a link to your documentation. For CI build status, go to the “Actions” page on GitHub, click your CI workflow, and under the three dot menu on the right, select “Create status badge.” It’ll give you an option to copy the Markdown text to display your badge. Copy into the top of your Markdown file.
![]()
For code coverage, go to your repo in codecov.io. You can copy the Markdown code under “Settings” / “Badge”:
![]()
For the documetation, copy the following into your README, replacing the link to your documentation:
[](http://bjack205.github.io/NewPackage.jl/dev)
Part V: Registering your Package
Step 22: Add Julia Registrator Bot to GitHub
Add the JuliaRegistrator bot to GitHub by going to to this page and clicking the “Install App” button and adding it to your repo.
Step 23: Check your Project.toml file and Submit a Request to the Julia Registry
Before subitting your package to be registered, make sure:
- All of your dependencies have a valid
[compat]entry - Your package version is greater than or equal to
v0.1.0 - Your CI tests are passing
Once you’re sure your package is ready, open a new GitHub Issue (usually titled
“Package registration” or something similar) and in the description field enter
@JuliaRegistrator register(). You should see an automatic response from the
registrator bot, which will open a PR against the Julia Registry. Check the PR for updates
and address issues that come up, either from the automatic checks or from the reviewer of
the PR.
Subscribe via RSS